Wednesday 28 January 2015

Key Terms

I thought it would be useful to look up the definitions for key terms in photography. This post will help me to remember to use these words within my own work.

Denotative: the literal meaning of a photograph
Connotative: how we determine the deeper meanings in the photograph
Signification: creating meaning
Studium:
the element that creates interest within a photograph; showing the intention of the photographer. e.g. journalistic photographs
Punctum:
the rare detail that attracts you to an image
Ideology:
a set of ideas established by the photographer; our assumptions on how to view the photograph
Conventions:
predetermined rules on what makes a suitable image; pertaining to a general agreement
Postmodern practice:
a late 20th-century style and concept, featuring abstract compositions flouting general photography conventions
Paradox:
something that seems like it may be contradicting itself

Sources:
https://georgepowell.wordpress.com/2008/07/01/studium-and-punctum/
http://dictionary.reference.com/
http://www.mediaknowall.com/as_alevel/alevkeyconcepts/alevelkeycon.php?pageID=ideology
http://www.slideshare.net/palmeri/rhetoric-and-ideology-of-photography
http://www.wisegeek.com/what-is-postmodern-photography.htm

Camera Practice

I decided to go out into Brighton and and tried to familiarise myself with the Nikon D7000 camera.

As I got into Brighton it started to rain, leaving the sky dark and gloomy. This made it challenging to adjust the exposure to make the pictures look clear enough. In the image below I tried to follow the composition tips by excluding unnecessary clutter within the image. I also tried to place the subject slightly off centre, following the rule of thirds composition. I think this image could have been improved by adjusting the shutter speed and aperture so that it would be slightly lighter. I think that increasing the aperture would also make the image look clearer. I would also increase the ISO to make the details in the trees sharper.
f/25, ISO 1250


I then experimented with depth of field and the point of focus. I used the selection button to focus on the graffiti in the background. I think this image would look better if there was more of a contrast been the colours in the foreground and the background.

f/25, ISO 3200
As the sun came out I decided to head down to the seafront. However it was almost too sunny leaving some of my images overexposed, even when lowering the shutter speed.

f/22, 1/3200
f/29, exposure: 1/1600


Here I wanted to focus on the large rock towards the right hand side of the image. This didn't work as successfully as I hoped as I wanted it to have even more of a shallow focus. However I think it still works with just having the edges of the image out of focus.
Here I used the rule of thirds composition but also focused on the centre of the image. I think this image would have been more successful if the focus was placed further towards the right or left hand side.
In this image I wanted to highlight the trail of footsteps as the focus in this image. I also used the golden spiral composition as I think that the eye would initially focus on the bottom right hand side of the image, then the woman and her dog, then the buildings in the top left hand corner, and finally round to the sky and sea.


Tuesday 27 January 2015

Session 2: Focus

Changing the aperture setting to experiment with deep and shallow focus. Also used the ISO setting to change the amount of detail in the image.


1. Deep focus - everything in the foreground and background can be seen


2. Shallow focus - the background appears blurred which emphasises the foreground


3. Zoomed shallow focus + high ISO


Reading Graham Clarke - How do we read a photograph

"Reading involves a series of problematic, ambiguous, and often contradictory meanings and
relationships between the reader and the image.
It is, in its own way, as complex and as rich as any written language"

In this reading Clarke deconstructs all the tiny elements of an image. His aim is to teach us that we should pay attention to all details in an image in order to evoke meaning.

A Family on Their Lawn OneSunday in Westchester,New York, 1969
Diane Arbus 


Clarke pays attention to setting, space, props, costume, lines, tone and more.

Friday 23 January 2015

Reading: Basics Photography Composition

"Photography is the art of selection"

The author describes that most pictures are taken without the use of considering composition. I think that this is true especially through the modern day camera phones where people mostly take photographs aimlessly. Following composition can give people a stable structure to start with, however it can be creatively restrictive thus resulting in stereotypical images.

My top composition tips from the reading:
  • Photograph what you see not what you think you see
          - Make sure to capture the right subject
  • Think about what to omit from the frame rather than what to put in
         - Choose a simple theme
         - Remove clutter in the background
  • Change the focal length
          - For portraits use a 35mm camera in the 75-100mm range. This will create a shallow focus.
          - Have the head and shoulders in the frame. 

Reading: John Ingledew - Loading

"You want to take photographs so that you can create things someone else will want to stare at for hours"

-Kjell Ekhorn


In the reading Ingledew gives an overview of what Photography is and some of its history.
  • Everyone has the opportunity to take their own pictures
  • Photography uses many elements such as chemistry, physics, optics, computers, electronics, commerce and creativity

Wednesday 21 January 2015

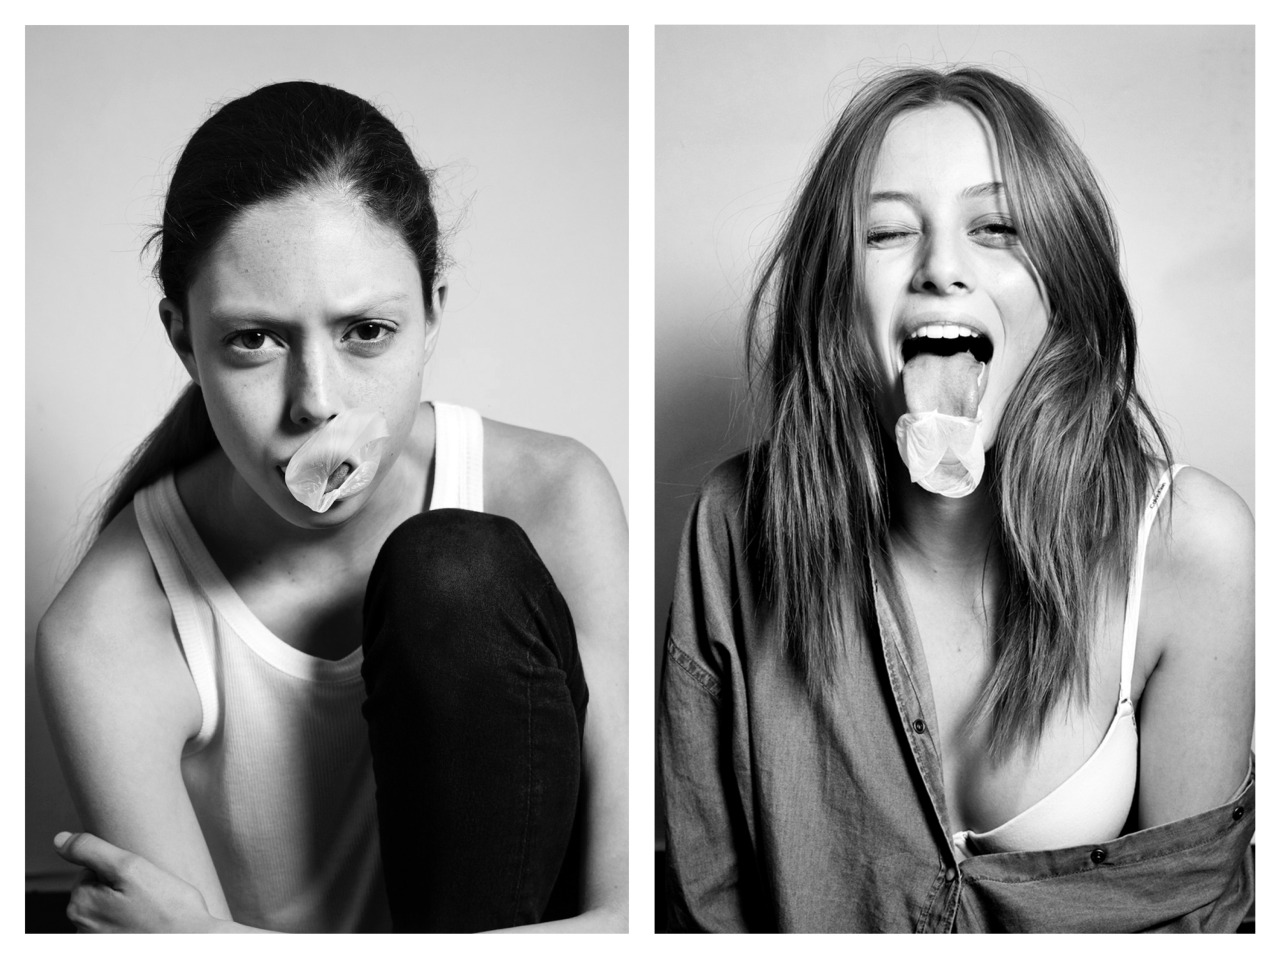
Photo inspiration: Fashion typology


Blow Up
Photographer: John Akehurst
Garage Magazine Autumn/Winter 2014-2015
Source: http://wearesodroee.com/2014/12/18/blow-up-2/

I found these images on tumblr and thought that they were inspirational. I like that each model is shown blowing bubble gum but the way they react to it is different. I believe this style of photography is referred to as typology.


"Typology is the study of types, and a photographic typology is a suite of images or related forms, shot in a consistent, repetitive manner; to be fully understood, the images must be viewed as a complete series" (Kristine McKenna, "Photo Visions," Los Angeles Times, 29 Dec 1991).


Article on typology: http://blog.redbubble.com/2012/04/photographic-typologies-the-study-of-types/

Tuesday 20 January 2015

Session 1

Today we had our first class where we learned a brief history of photography starting with when the first camera was introduced in 850 BC, to modern times with camera phones.
We also learned the basics of camera settings and used the Nikon 5700 to explore the use of aperture.

When using the 'A' setting on the camera I was able to change the aperture which changed the amount of light that was let in to the camera. The camera then automatically sets the rest of the settings. Sometimes this meant that the shutter speed was still slightly too long and make the images look blurry. This could be prevented through the use of a tripod, or by using the manual setting 'M' on the camera to adjust both the aperture and the shutter speed.

1. f/4.5

This image had a very high aperture which meant that the camera allowed lots of light in. This lead to the picture being overexposed.


2. f/14

Here I used a lower aperture setting which made the image much clearer. I think this was the perfect setting to use as it was starting to become dark outside, but in this picture it has enough light to be able to make out what is shown in the image.


3. f/122

This image appeared to be way too dark since I had used a small aperture.